Many of the bolt-action rifles hanging on your shop’s walls are wearing thread protectors, and the vast majority of those purchased probably leave in the same condition. Why? Offering to mount a correctly fitting muzzle device can improve the bottom line and nurture a long-term customer relationship, and most mount faster than NICS background checks clear.
Odds are good you have already have a nice inventory on hand, in different styles and variety of thread patterns. Mention that at the register, cite the firing-line advantages they provide and note how color and finish are best matched to the gun in person, rather than risking online descriptions and the wild color swings between computer monitors and device screens.
Not everyone will take you up on the offer, but when it’s time to make that aftermarket purchase, they’ll remember your offer and warning that finishes vary. A few simple words help move inventory, and most who purchase will opt to self-install. Even in those cases when they prefer the task to be completed by someone more experienced, the process is simple, effortless and accomplished in minutes.
Muzzle brakes and compensators that require the precise timing made possible by peel washers or spacers are not complicated, but different altogether. Applying the necessary heat or experimenting with multiple thicknesses can be time consuming, and not every tactical retailer has an abundance of manpower resources. These steps address the simpler crush washer system for that reason.
Yes, every gun in your shop has its safety engaged, but check before beginning the process. Customers like to work the fire controls before making a purchase, and many of 2020’s first-time gun owners are coming back for upgrades. A lot of them have yet to build that habit into muscle memory, so double-checking is always a good policy.
Keep the gun pointed in a safe direction, always, then drop the magazine and move it from your workspace. Ensure there are no cartridges in blind magazines, if it has one, and open the bolt. Look and feel inside to ensure there is no cartridge remaining in the chamber. Use a flashlight for a good look inside if lighting is a little dim at the counter. Removing the bolt from the rifle is a great additional safety step and an opportunity to review the process for the new owner.
Now you’re ready to remove the factory-installed thread protector. On nearly all models, it comes off easily by hand, but if it proves stingy, you may have to apply leverage with a wrench or other tool. Pad anything used with a soft cloth or non-marring fabric, however. Don’t scratch the finish, even though it will likely be discarded or forgotten in a gun safe corner.
Once it’s off, make a quick inspection of the threads and contact surface for burrs and debris. They’re rare, but anything left behind will compromise seating or, worse, lead to loosening.
Open the muzzle device’s packaging and double-check the described thread pattern described on the instructions matches that of the barrel — all are not identical. If correct, twist the device on a few turns just to double check and make sure it goes on freely, then remove.
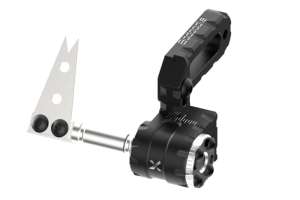
Follow the manufacturer’s instructions throughout the process, but the next step is placing the crush washer on the barrel. The muzzle device, in this case a compensator, goes on next.
Using an armorer’s tool or wrench, again padded to prevent marring at any bare metal-to-metal contact if necessary, tighten per specifications. Doing so will crush that washer, yet allow a limited amount of turning for cosmetic alignment of the vents with the rifle and its barrel.
That’s all there is to it. Wipe down the gun, replace the bolt and magazine and you’re ready to hand it back to the new owner — after making sure the safety is still engaged, of course. It’s fast and efficient and a great addition to any day’s sales total. Place the thread protector in a small resealable plastic bag and toss in a business card for good measure.
It is important to note that there is no shortage of high-quality brakes and compensators that require precise positioning/timing to realize their full benefits at the firing line. Some utilize peel washers, others so-called spacers (washers of different thicknesses) or locking nuts. More than likely you have some in stock, but performing their installation is more labor-intensive and exacting. If you’re looking for something to bolster the bottom line without an undue addition to payroll or inventory, a selection of crush-washer anchored muzzle devices is a solid business decision.