The record-setting pace of firearm sales is welcome news for tactical retailers, but it gets even better when you consider the results of a survey conducted by the National Shooting Sports Foundation. Forty percent of the guns flying off shelves earlier this year went to first-time owners. By now, those new owners are comfortable with that purchase, hopefully training and likely looking for accessories to enhance performance.
Many of those who’ve recently acknowledged firearms as a viable home- and self-defense tool don’t have years of experience under their belts or confidence to perform most simple installations. Dispensing knowledge in a diplomatic fashion at the counter and providing value-added service go a long way into turning those new faces into loyal customers.
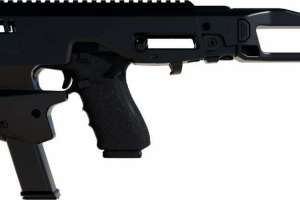
There’s opportunity to do so in the number of modern sporting rifles wearing high-power optics that went home with first-time owners this year. The setup might have been all that was available at the time, but now that new enthusiast has discovered it’s far from optimal for protecting themselves and family at home in low light.
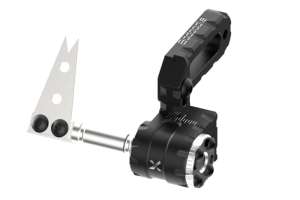
Backup iron sights are the ideal solution, and with 45-degree offset versions, installation at the counter is a breeze. The owner doesn’t sacrifice the optic, dozens of versions are available, and putting them on is fast and easy, providing an opportunity to share the kind of knowledge they don’t get by hitting the “buy” button on the internet.
As always, consultation is key. Make sure the customer understands that acquiring a proper sight picture with the new units requires slight rotation of the rifle. Determine the model they prefer in your inventory, explaining the advantages of posts, tritium, ease of adjustment, etc. Once that’s settled, it’s time to ask if they shoot right- or left-handed — the sights go on the dominant, trigger-finger side of the rifle.
Installation begins with safety. Make the gun safe, remove the magazine and place it away from your work area. You don’t want a well-meaning coworker to reinsert it if you step away to answer the phone. Double check the chamber is empty before proceeding. If it’s a new owner on the other side of the counter, feel free to be animated during this mandatory procedure.
Determine where the new sights will attach and inspect if an MLOK or other adapter is required. Clean those anchoring locations on the gun. Dirt left here or on the sights/adapters will work loose sooner or later and cause a frustrating migration between point of impact and point of aim. Gun owners talk, so avoid frustrated customers by taking the few extra seconds to remove grime.
Inspect the mounts — if any are required — and both sights before starting, then clean their surfaces. Follow with a cotton swab to get those corners. The latter step leaves a small tuft of cotton on any metal burrs you might have overlooked.
Follow the manufacturer’s directions on positioning, but typically you want to create a long sight radius by placing the sights as far apart as possible. The approach enhances usability for new shooters, and it’s an advantage even veteran enthusiasts understand.
Determine the front sight position and ensure it does not encumber access to other accessories. Then install any required adapter by placing and tightening to manufacturer specifications. Follow with the sight, but while doing so, apply firm finger pressure on the unit toward the front of the gun while torqueing it down. A flush fit against the front of the groove minimizes chances of shifting under recoil. Find the rear sight’s location and follow the same procedure. Bear in mind, though, not all companies recommend thread-locking compound, and many sights come with it pre-applied on the bolts, anyway.
To get the sights/gun on paper, simply bore-sight. Place the gun on a solid rest, insert a laser bore sighter and shift the firearm’s position until the red dot is on a target. You can also push out the takedown pin on an AR-15, rotate the upper and lower receivers apart, remove the bolt carrier group and charging handle and adjust until you see the target when looking down the barrel’s bore.
Now, without moving the gun, carefully adjust windage and elevation according to the manufacturer’s directions. You’re done when the sight picture also aligns on target. The installation is complete, except for the last step. Let the owner work the sights, pointing the unloaded/magazine-free gun in a safe direction. Make sure they’re comfortable with the setup, then provide detailed information on how to adjust the sights, if necessary. Odds are good it’s ready for home- and self-defense work, but they’ll appreciate the info and know who to visit when they shop for their next gun.
One— Safety is first and foremost. Make the gun safe, remove the magazine and place it away from your work area.
Two— Double-check the chamber is clear before proceeding.
Three— Clean where the sights will mount on the rifle — whether MLOK or rails — thoroughly. Grime, debris and dirt left behind will ultimately work loose and migrate point of aim away from point of impact.
Four— Any rail strips being attached to MLOK should also be scrubbed. A final pass with a Q-tip in tight corners is a good idea because it will leave a cotton tuft on any protrusions or sharp edges you may have overlooked during initial inspection. Those blemishes can be problematic in securely anchoring the sights.
Five— Clean and inspect all contact areas on both the front and rear sights.
Six— Once any required MLOK or other adapters are installed, you’re ready to mount the first sight. In this case, the process started at the front, although that’s personal preference. Apply firm forward pressure on the sight while tightening to prevent shifting under recoil.
Seven— Now you can anchor the second sight. Follow the manufacturer’s directions, but the further apart, the longer the sight radius. Torque according to the instructions.
Eight— Now it’s time to get the gun on paper. Use a laser bore sighter if you have one. If not, rotate the upper and lower receivers apart, then remove the bolt carrier group and charging handle. Anchor the gun on a solid rest and adjust the rifle’s position until you see a target’s bull’s-eye when looking down the bore.
Nine— Gently adjust the front and rear sights according to manufacturer’s specification so that they, too, present a proper sight picture on that same bullseye.
Ten— With the gun bore sighted and the system set up, it’s time to hand the unloaded and magazine-free carbine back to the owner with a smile to double-check their comfort and ensure satisfaction.