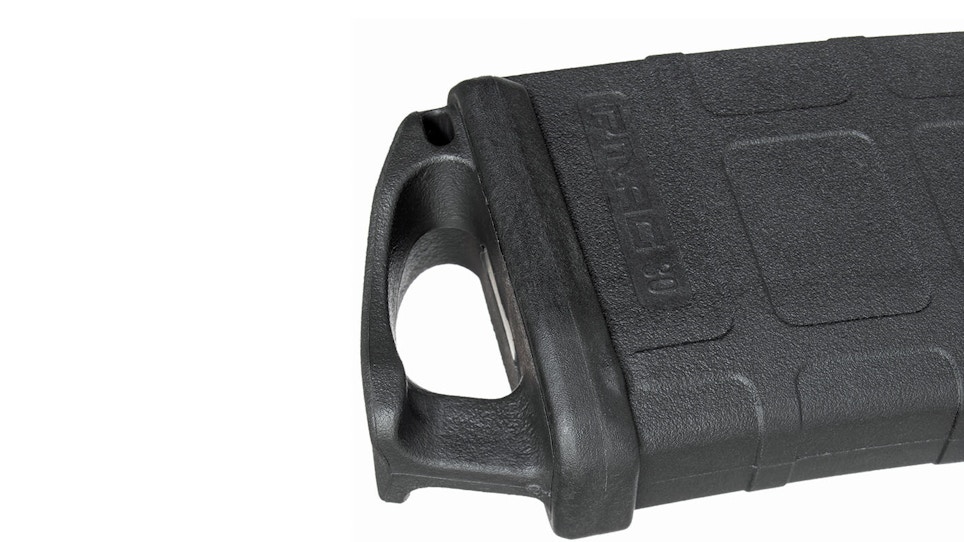
Not everyone coming through your door is tier-one material, although many of the items popular with real operators are versatile in a different way for civilians. Aftermarket plates designed to mount on polymer magazines are a good example. Many professionals use them to speed magazine retrieval from pouches — a real challenge with gloved hands. Keep them in stock and their looks alone make them a nice impulse buy, but does your staff mention them and offer installation when someone’s at the counter purchasing magazines?
Regardless of the magazine brand you carry or sell the most of, if the body is polymer, there’s likely a version of these out there that fit. Installation is fast and almost effortless, and it can add to your profit margin. Best of all, it reinforces your store as the place in town that provides customer service, before and after each sale.
Despite the fact an average gun owner will never need to retrieve a full magazine with lifesaving speed — action shooting sports competitors being the biggest exception — these aftermarket plates provide several other advantages for civilian enthusiasts. ARs often wind up rested on their magazine, for example, when shooters try to stabilize the gun for precision shots. Many of these plates are soft enough to cushion that load and stabilize the rifle. It’s certainly not an optimal solution, but it qualifies as a better field-expedient approach than a magazine directly on uneven terrain.
Polymer can crack when dropped on concrete or solid surfaces. It’s rare, but always happens at the wrong time — like during training sessions. Having one of these mounted helps minimize that risk.
Shooters love to experiment with different loads, but reloading magazines while at the shooting bench isn’t exactly optimal use of firing-line time. Cartridges stuffed the night before, into identical magazines, increase the chances of confusion as they try to sort out which bullet weight printed those tiny groups. Aftermarket magazine plates can remove guesswork, without the addition of unsightly paint. Color-coded cord or yarn through the lanyard loop slots, if they have them, are an easily removed remedy.
Add the fact magazines with one mounted are indeed easier to fish out of range bags, and the odds are good you’ve piqued the customer’s interest. If they take advantage of your installation offer, the procedure’s fast and simple.
Start by opening the aftermarket magazine plate package and inventorying parts. Nearly all are simple slip-on, locking units, so the odds are good contents are minimal. Check just in case and ensure there are no ugly scars or burrs before proceeding.
Prevent headaches and save time by inspecting the interior surfaces on the new plate that will grip or mate with the magazine body. Any dirt and grime there slows the process unnecessarily, and factory debris occasionally migrates there. Clean if necessary.
If the model selected has a lanyard hole, check to ensure it’s open and free of blockage. You don’t want to discover that problem after installation.
Inspect the bottom of the magazine it will mount on, and identify the button(s), tab or bar that needs to be depressed for removal of the stock plate. Then determine which direction the stock unit needs to move for replacement.
Depress that button or tab and apply firm pressure in the proper direction to remove the stock plate. After a little travel, you can release the tab, but maintain control as the part slides off to prevent the spring and locking mechanism below from flying out. If that happens, time will be lost collecting parts, apologizing to the customer and realigning components.
Once removed, then you can slowly allow the spring and interior plate riding on it to expand fully. Do not remove them.
Inspect the sides and bottom of the magazine for any process-slowing debris and clean if necessary. Odds are good they are pristine, but it’s still worth a quick look.
Now place your thumb on the interior plate, hopefully still on the magazine’s spring, and depress it, compressing the spring until they are in the magazine body. With the other hand, align the new magazine plate and begin sliding it on.
After some travel, the new magazine plate will hold the spring/plate assembly captive, allowing you to remove your thumb before it gets pinched. Continue moving the plate until you hear or feel a “click” as the tab or button locks the new unit into place. Visually inspect for full engagement and you’re done.
The most time-consuming part of the process is opening the packages, assuming you’ve done it a time or two. It’s simple and straightforward, and, best of all, it sends another satisfied customer out the door willing to brag about your service and come back for more.
