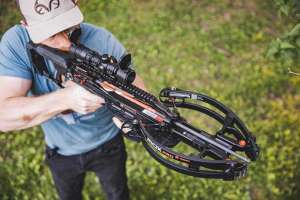
The difference between a well-tuned bow and one that is not is pretty simple: the tuned bow delivers pleasant shooting characteristics across the board. The setup draws smoothly, lines up well with the shooter’s frame, and delivers arrows almost effortlessly into tight clusters, even when using various types of broadheads. As a result, the shooter’s mind is filled with positive thoughts — and confidence reigns as a result.
On the other hand, a bow that isn’t tuned well causes irregular cycling of the arrow, increasing shot noise, vibration, and erratic arrow flight. The bow doesn’t accommodate the archer’s body well, either, triggering undue muscle strain and poor relaxation while drawing and shooting. This magnifies the issue, and shooting consistency becomes totally out of reach, particularly with broadheads. Instead of promoting certainty and an optimistic mind for opening day, the shooter is left deflated, frustrated and oftentimes angry.
Fortunately, this nightmare of a poorly tuned bow can be avoided with some basic bow tweaking, simple arrow tuning, and some friendly shooting advice. Here’s a seven-step plan for getting your customers dialed-in and deadly for hunting season.
1: Stressing Good Bow Fit
Most archery shop pros I know are good about pointing customers in the right direction when it comes to buying a top-notch bow. The problem is most customers insist on using the same draw length and weight as their old rig. This is where things begin to deteriorate, as 9 out of 10 times the draw is way too long and way too heavy on their previous bow for their stature.
It’s critical — whether the customer is an avid archer or a beginner — to point out set up flaws that negate proper shooting form and effective arrow tuning. Regardless of the bow’s price/quality, it should accommodate the shooter’s body perfectly to accentuate comfortable, relaxed shooting.
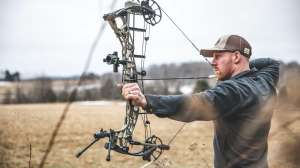
What does good form look like? Armed with the right setup, when at full draw, the archer should resemble the letter “T.” Their feet should be about shoulder width apart with toes pointed approximately 90 degrees to the target. The torso should resemble a straight vertical line — directly over the feet, without leaning forward or back. The top of the shooter’s bowhand should be in line with the top of the shoulders all the way through the bottom of the draw-arm elbow. This forms the horizontal line. The bow-arm shoulder muscle (i.e., deltoid) should not be flexed or expanded. It should be in its low, locked, and relaxed position. Whereas the draw-arm elbow is in line with the path of the arrow — not to the left or right.
These are all telltale signs that identify proper draw length. If the bow is too long or short, the archer’s body won’t look like a T. Instead, it’ll look crooked and unnatural. While providing archery instruction, I often tell folks that good shooting form should feel as if you could almost fall asleep at full draw — it’s that transformative for keeping you relaxed and focused while shooting.
Draw weight is vital, too. If the draw weight is too much, the shooter will exert increased muscle movement to get the bow to anchor. This is bad, as the focus should be to minimize muscle activity. When drawing, the archer’s draw-arm elbow should rotate slightly above the top of the shoulder joint, while most of the bow’s tension transfers directly to the back’s rhomboid muscles. These muscles are very capable of steadying the weight of the bow to promote improved aiming and relaxation.
Many veteran archers don’t like the idea of changing their bow setup too much. It can be a real touchy topic. But when you approach the issue with humility, while outlining and even demonstrating the advantages of good shooting form, they typically will listen.

2: Synching the Cams
Once the customer is on board with a bow that fits them properly, now’s the time to set the draw length, draw weight, and to synchronize the bow’s cam system. The key, of course, is to set the cam rollover so each cam strikes its draw-stop peg at exactly the same time. This will promote level nock travel and wobble-free arrow flight.
The best way to fine-tune cam synchronization is to stick the bow in a bow-drawing device, then crank it slowly to full let-off. I use Last Chance Archery’sDraw Board and it works great. This allows you to observe precisely which cam is hitting the draw peg before the other, compared to the old-fashioned way of drawing the bow and then having a friend look at the cams’ positioning, all while you muscle the bowstring in and out of the draw valley.
Begin by adding one full cable twist to the cam that hits the draw peg first, then depress the bow. Then check the cam’s rollover again. Continue adding cable twists — even half twists — until the cams are synchronized. Once dialed in, it’s always a good idea to shoot the bow a few times, then check cam roll-over once again, just to be safe. Cable fibers often need to settle in after being twisted or untwisted.
3: Setting Center Shot
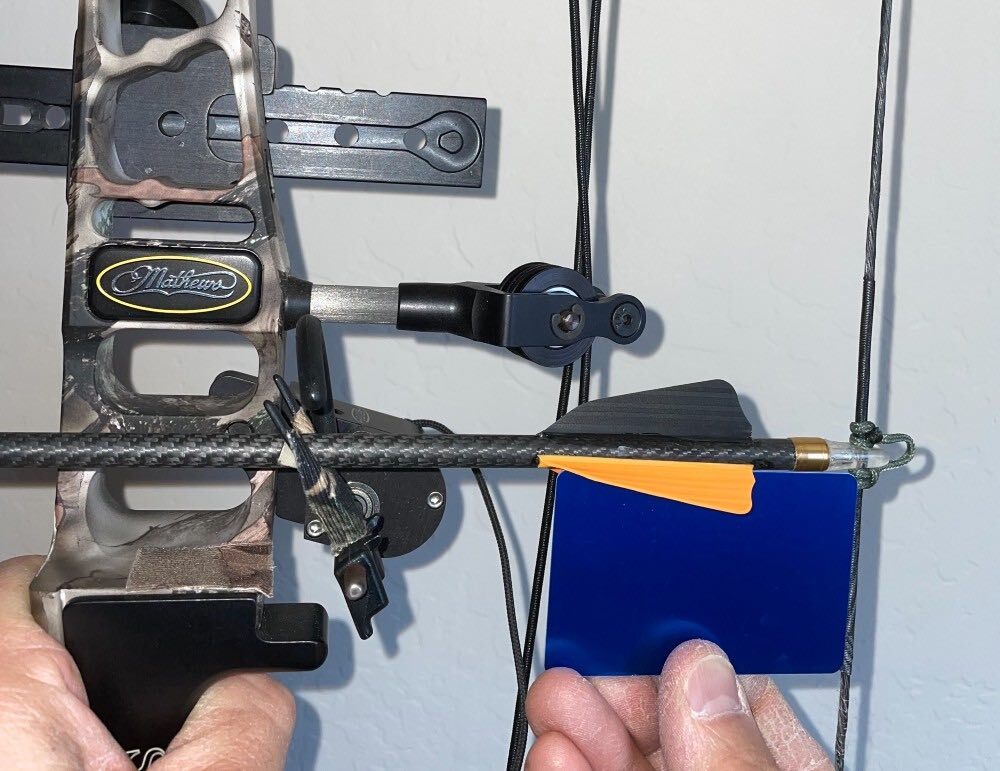
Proper “center-shot” is done by adjusting the arrow rest left or right until the arrow shaft aligns with the natural path of the bowstring. In most cases, center-shot is usually 5/8 to 1-inch out from the riser’s edge to the center of the shaft, while vertically the arrow should be in line with the threaded arrow rest hole. A quick way to verify proper center-shot is to fasten the arrow to the bowstring and then hold the bow at arm’s length while the bottom cam rests on your leg. Next, close your non-dominant eye while visually aligning the bowstring with the string grooves in the cams, then mark where the position of the bowstring bisects the bow’s grip and arrow rest. This is the exact location where the arrow should be positioned for proper center-shot.
Once this is done, adjust the D-loop so the arrow clips to the bowstring at a 90-degree angle. This can be done quickly by using a business card butted up against the bowstring and arrow shaft or by using a T-square device to measure nock height precisely.
4: Punching Paper
Paper tuning is the preferred method for correcting improper arrow flight. Start by shooting from 4 or 5 feet away, then shoot again from 10 feet to ensure the pattern remains the same.
The goal here is to achieve a “bullet hole” tear with only the footprint of the shaft and vanes and nothing else. It’s best to tune first with an un-fletched shaft, by wrapping 3 inches of electrical tape where the vanes attach. This gives the shaft the same front-of-center balance as a fletched arrow. The primary reason for using an un-fletched arrow is to eliminate vane contact and to create the smallest tear possible for more precise tuning.
When paper tuning, attempt to tune out vertical tears first. For a high tear, lower the D-loop on the bowstring or move the arrow rest up. For a low tear, raise the D-loop or move the arrow rest down. For a tail-left tear, you’ll move the arrow rest very slightly to the right. For a tail-right tear, you’ll move the arrow rest very slightly to the left. I say very slightly because any large tears will have to be resolved by following the next step — by tuning the bow’s limb harness or the cam’s position on the axle.
Once you get the un-fletched shaft punching a “bullet hole” in the paper, shoot a fletched arrow to confirm perfect arrow flight. If you get a large tear all of a sudden, then you’ll know vane contact is the culprit. To remedy this, spray the vanes with white foot powder and check for “contact smears,” then rotate the arrow’s nock in hopes of eliminating the contact. You can also try using low-profile vanes (e.g., switching from Bohning’s Blazer to Bohning’s X Vane) to improve fletching clearance. Troubleshoot this until the arrow exits the bow in a perfectly straight pattern.
5: Dealing With Large Tears
Despite thorough tuning, persistent tears can occur, especially left or right tears. When this happens, don’t move the arrow rest too far left or right in hopes of correcting the problem. Usually this does very little and only places the arrow too far out from the proper center-shot position, which can cause other shooting issues.
In most cases, large tears are caused by improper nock travel, meaning the bow’s limb and cam positioning are not lined up well. The best way to fix this problem is to “yoke tune,” which alters the vertical positioning of the cam, in hopes of better aligning the cam’s string grooves with the bowstring’s power path.
Whether the bow has one or two split yokes fastened to the outer limbs, start by adjusting the top yoke first. You must press the bow first, then add/undue twists to the yoke.
With a left tear, twist the left side of the string yoke and untwist the right side in equal amounts. With a right tear, twist the right side of the yoke and untwist the left in the same fashion. Make one to two twists at a time, then recheck the tune. Do this until you achieve a perfect arrow rip in the paper.
On a bow with a top and bottom yoke, the top yoke tends to yield the most significant tuning change, since the arrow’s position is closer to the upper-axle area. However, the bottom yoke can be adjusted as well to optimize arrow flight.
On bows without yokes, such as Hoyt’s HBX Cam models, “cam tuning or shimming” will have to be the next step. When repositioning the cam on the wheel axle, always move the cam in the direction of the tear. It’s best to shim the top cam first unless the bottom cam seems visually more out alignment to you than the top cam.
Move the cam very slightly to the left to correct a tail-left tear, or to the right to correct a tail-right tear. Most cams have spacer kits available from the manufacturer, otherwise Last Chance Archery and Buckeye Archery Solutions make great aftermarket spacer kits.
6: Handing It Off
Once the bow’s tune is set to perfection, now you can hand things off to the customer, if you haven’t already done so. Check to see if they can achieve the same bullet-hole performance as you did. If not, all is not lost. The problem usually lies in the shooter’s grip. In all my years of tuning bows, I’ve found that most archers can’t shoot a clean tear in paper because they grip the bow horribly — by putting too much palm on the grip, by clenching it like a vice grip, or by keeping their fingers completely open but then grabbing the front of the grip the moment the arrow is released. Any of these will induce riser torque and produce poor arrow flight.
To ensure a good tune, go over the basics of gripping the bow properly and have the customer shoot several more arrows until their shooting form improves. This will usually eliminate a bad paper tear and pave the way for the final accuracy step.
7: Ending Well
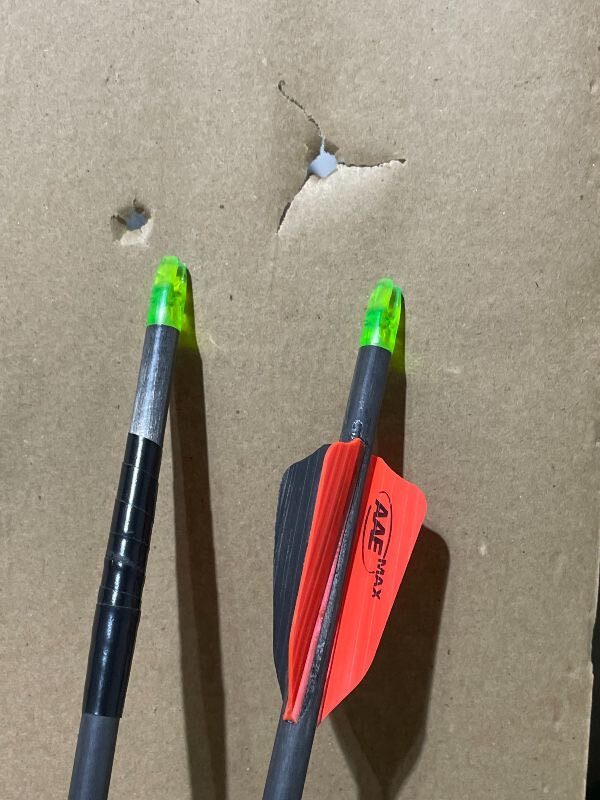
A great way to end all your work and to show the customer just what a good tune can do is to shoot a bare-shaft — the same arrow with the electrical tape you used for paper tuning in step No. 4 — at a 20-yard bull’s-eye. Follow up with another shot, but this time use a fletched arrow. If the bow is tuned well, usually both arrows will group together. If not, make a few micro adjustments to the arrow rest and/or D-loop height until the arrows converge.
If the bare-shaft strikes above the fletched arrow, move the arrow rest down or the D-loop up. If it strikes below, move the arrow rest up or the D-loop down. If it impacts to the left of the fletched arrows, move the arrow rest to the left. If it impacts to the right, move the rest to the right. Make very small 1/32-inch adjustments at a time. Keep adjusting until the bare shaft collides with the fletched arrows.
From my experience, bare-shaft tuning optimizes broadhead flight and helps bring field point and broadhead groups together. Once the bare-shaft tuning is completed, be sure to tell the customer they can continue the tuning process by shooting the bare-shaft and their regular arrows out to 30 yards, given it’s on a non-windy day. They’ll be certain their bow is dialed in to perfection when they see the bare-shaft striking dead center with the fletched arrows at that distance!

Sidebar: Release Aid Size-Up
While going over proper bow fit and shooting form, be sure to observe the customer’s ability to trigger the shot smoothly. If the wrist-strap release aid is adjusted so the tip of their finger is on the trigger, suggest getting a deeper bite on it, such as near the first knuckle. Typically, this offers greater control and smoother shooting.
If you notice the archer is prone to jerking or smashing the trigger — a common shooting malady — recommend switching to a thumb-operated T-handle release, or to consider using the middle finger instead of the index finger to trigger their wrist-strap release. The middle finger is much less sensitive, and the change can help restructure their shot sequence entirely.
Encourage them to practice the technique using a simple string-bow made of parachute cord (photo above), until they’ve mastered the new way of shooting. This can go a long way in helping them establish the right muscle memory to improve shooting, especially at the moment of truth.
Photos by Joe Bell