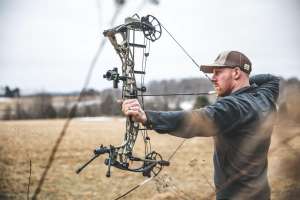
Today’s high-quality optics are light years ahead of what was available only a few years ago. Manufacturers are aggressively pushing the laws of physics and gun owners are the real victors in the battle — especially tactical shooters.
Zoom ranges once thought impossible allow enthusiasts to have their proverbial cake with a CQB-friendly wide field of view at low power, yet the ability to dial up to incredible magnification and connect at long distance — figuratively eating the competition at matches. The advantages are obvious at the firing line, in the unpredictable combat environment and even hunting.
Adjusting magnification reliably and quickly — without breaking cheekweld — can be a challenge, though, especially in poor weather or when wearing gloves. Manufacturers recognized the problem and started elevating a section of the zoom ring into speed bumps of sorts, but some are small, hard to find under stress or little more than cosmetic afterthoughts.

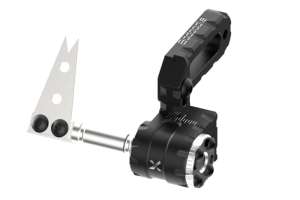
Installing a speed lever on a riflescope isn't difficult, but it does require several steps that must be followed with accuracy. (Photo: Guy Sagi)
Easily installed aftermarket lever systems for added mechanical advantage are the answer and are made in a variety of flavors by major manufacturers. Middle-tier companies offer models too, and more than likely your store offers at least one “universal” polymer version even the budget-conscious will add to their purchase. If nothing else, plant that seed before they head out the door and it has the potential of growing another return customer.
For clarity, the photographs seen here were taken with an unmounted riflescope to provide a detailed look at the principle involved. Nearly all the models on the market today go on just as quickly and easily if the optic remains mounted on the rifle.
Today’s optics are often lifetime investments, so follow the manufacturer’s instructions carefully. The steps might not be identical to the ones shown here, so a preemptive review goes a long way.
Obviously, if the riflescope is mounted on a firearm, drop the magazine, check and double check that it is unloaded before beginning, and engage the safety. A method of securing the rifle to your workbench in a safe direction during the process will minimize the chances of marring the finish, too.
Most aftermarket lever versions take advantage of the bump on a manufacturer’s zoom ring. Locate it and rotate to the upright/middle position. Not all mechanical-advantage aftermarket levers can be mounted to optics that do not have the raised-relief feature. Check manufacturer specs before starting. Even if compatible, centering the unit minimizes the risk of it encountering an obstacle on the rifle, rendering the optic unable to take advantage of its entire magnification range.
You’re adding hardware that may encase dirt, grime and moisture. Clean thoroughly before mounting anything and dry to avoid rust or other problems down the line. Anything caught underneath can also prevent a flush and reliable mount. This thing will be turned with force, so inspect closely before proceeding.
Place the lever on the speed bump to determine how much, if any, of its underside needs to be trimmed to make a flush mount. Ideally, there will be no gap between it and the zoom dial once installed.
Use a box cutter or fine scissors to remove excess material. Some manufacturers provide easy-to-use slits to help guide dissection.
Replace the unit on the scope and inspect for gaps that indicate more material needs to be removed. Sometimes a small piece of polymer will be all that separates you from an ideal trim, and in that case, you can use a fine-toothed file to finish the fit.
Attach one side of the band to the lever housing, following the manufacturer’s instructions. If there’s a screw involved, like in this unit’s case, the odds are good it should not be tightened fully at this point. In fact, thread it just enough to hold the pair together and no more.
Place the lever properly on the zoom ring and wrap the band around it tightly to reach the other side, ensuring it is straight. Measure where it completes the circle and goes into the housing. Mark the spot.
Cut there and file if it results in a ragged edge. Check to ensure the band and lever housing are clean underneath, then place back on the scope in the correct position. Insert band in the slot, then place and tighten its screw (if any are required).
Ensure the unit is mounted straight, then fully tighten the first installed screw. It torques the unit onto the power ring.
Check that it doesn’t give under stress, inspect for fit and you’re done.
Featured image: Guy Sagi