With 2.32 billion regular monthly users — 1.52 billion of whom log in daily — Facebook is a useful platform for reaching potential customers. But the social media giant has recently moved to a more pay-to-play system, which means your posts aren’t reaching your target audience the way they did even a couple years ago.
If you want to use Facebook to grow your business, you’re going to need to run paid ads.
First a word about Facebook’s take on weapons. Facebook does not allow any paid promotion of what they consider “weapons” and accessories.
Facebook Policy 7: “Weapons, Ammunition, or Explosives Ads must not promote the sale or use of weapons, ammunition, or explosives. This includes ads for weapon modification accessories.”
Therefore, you will NOT be able to use Facebook’s ad program to market bows and arrows, and maybe even some on-bow accessories. However, the ad program can still be effective to market camo clothing, backpacks, trail cameras and other non-weapons products.
The Anatomy of a Facebook Ad
It’s easy to feel overwhelmed when you first start running ads on Facebook. Before you dive in, it’s helpful to understand the structure of a Facebook campaign.
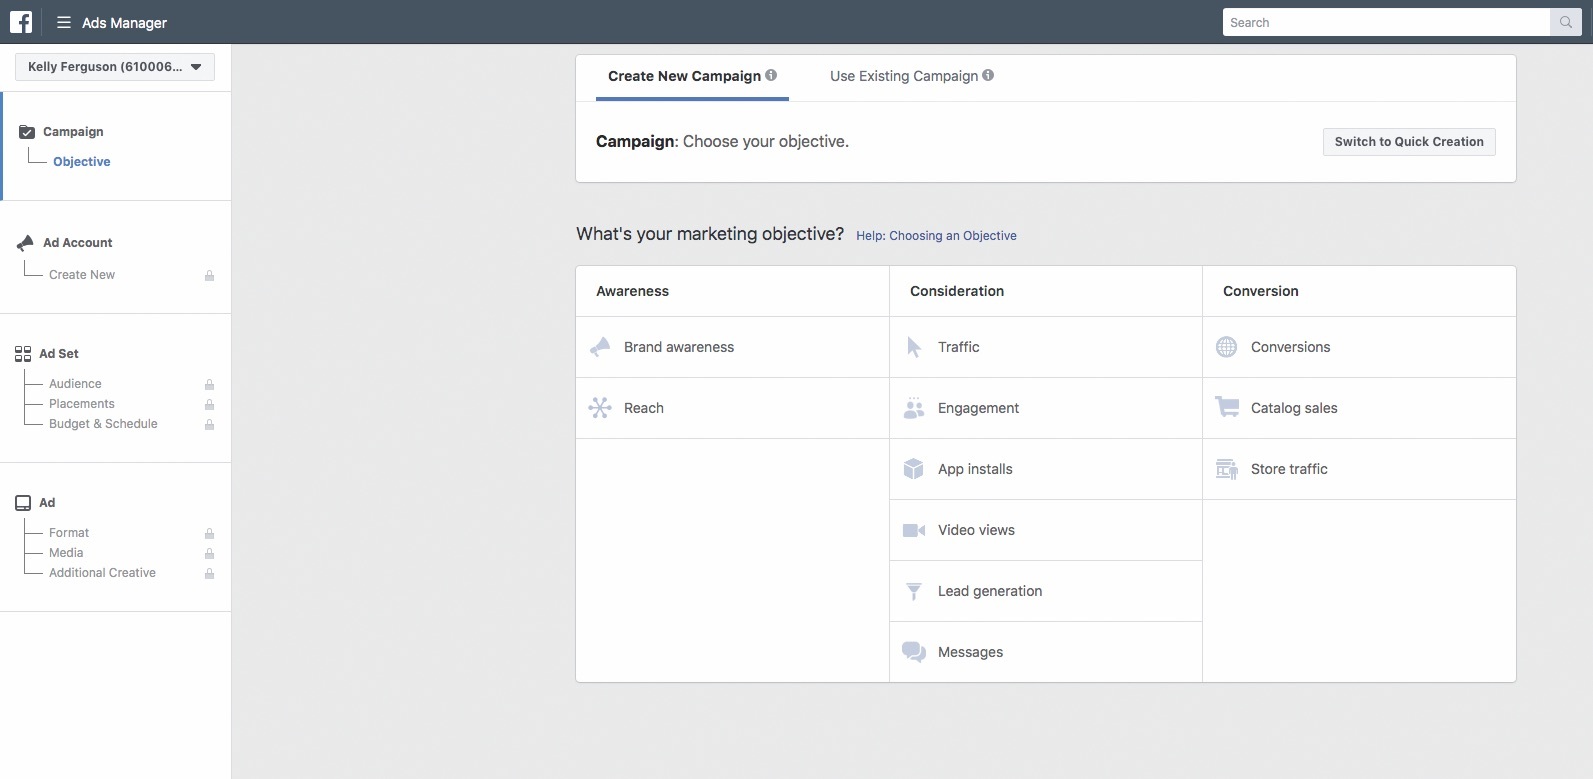
Facebook campaigns have three levels: campaign, ad set and ad.
The campaign level is where you set your marketing objective. Do you want to drive more traffic to your website? Are you looking to add email addresses to your mailing list? Would you like more foot traffic in your shop? Tell Facebook what you want, and the algorithm will serve your ad to people most likely to do what you want them to.
The ad set level is where you set your targeted audience and your budget, as well as decide where you want your ad to appear. Here, you can create a custom audience based on location, age, gender and interests. You can specifically target people who’ve already liked your Facebook page, or you can try to expand your reach by excluding people who are already Facebook fans. You can ask Facebook to show your ads only to people who live within a specific geographic area, or you can tell Facebook it’s OK to show your ad to people who are currently visiting your area. Most importantly, you can tell Facebook exactly how much you’re willing to spend on your campaign. In addition, this is where you can tell Facebook if you’d like your ad to show up in Instagram, if you’re OK with your ad showing up in Facebook’s right-hand column or if you only want your ad to appear in Facebook news feeds (that’s generally the best choice).
The ad level is where you build the ad your audience will see. You will select your image or video, create your headline and ad copy, and choose your call to action.
This is an oversimplification, but you can think of it this way: why, who and what. The campaign is why you’re running the ad, the ad set targets who you want to see it and the ad is what people will see.
Where to Go to Run an Ad
The Facebook Ads Manager is where you’ll create your ad. To get there, go to your Facebook profile and check out the options in the left-hand column. The Ads Manager may appear as an option under “Explore.” If it doesn’t, you should see “Create” at the bottom of the page. Click on Ads, and you’ll be taken to the Ads Manager. In the event you don’t see either of these options, simply Google Facebook Ads Manager and you can get there that way. The Ads Manager offers a number of tools to help you with your marketing, but if you’re new to advertising on Facebook, just start with creating an ad. Once you’re in the Ads Manager, you should see a green “Create” button on the left-hand side of your screen.
7 Steps to Your First Facebook Ad
Ready to start? Let’s walk through what you need to do to run a Facebook ad.
1. Set Your Marketing Objective
You’ll start with the campaign level. When you begin your ad, Facebook will ask you if you want to create your campaign using guided creation or quick creation. You should use guided creation if you’re new to Facebook ads.
Facebook will then show you several options for objectives. What is the purpose of your ad campaign? Of the options Facebook provides, I would recommend starting with one of the following. Traffic (driving digital traffic), Lead Generation (adding to your mailing list) or Store traffic (getting more people to your shop).
Once you’ve selected your objective, name your campaign. You can have multiple ad sets per campaign, and multiple ads per ad set, so your campaign name can be broad. Calling it something like “Store traffic” will work just fine.
2. Choose Your Audience
Once you’ve established your campaign objective, you’ll move on to the ad set level. Here is where you tell Facebook who you want to see your ad. You don’t actually want a huge potential audience. You’ll be charged based on how many people see your ad, so you want to reach the people most likely to respond to your ad.
You could create a custom audience by uploading your existing customer email list. Facebook will match emails to Facebook profiles and show your ad to those people. But you can also create a custom audience from scratch.
Start with your location. Facebook gives you the option to serve your ad to everyone in this location; that’s generally the best option (as opposed to selecting only people who live in that area). This means Facebook will show your ad to people traveling through your area, such as traveling bowhunters who might need emergency bow service. Next, you can choose what age groups to target and whether you want to target men, women or both.
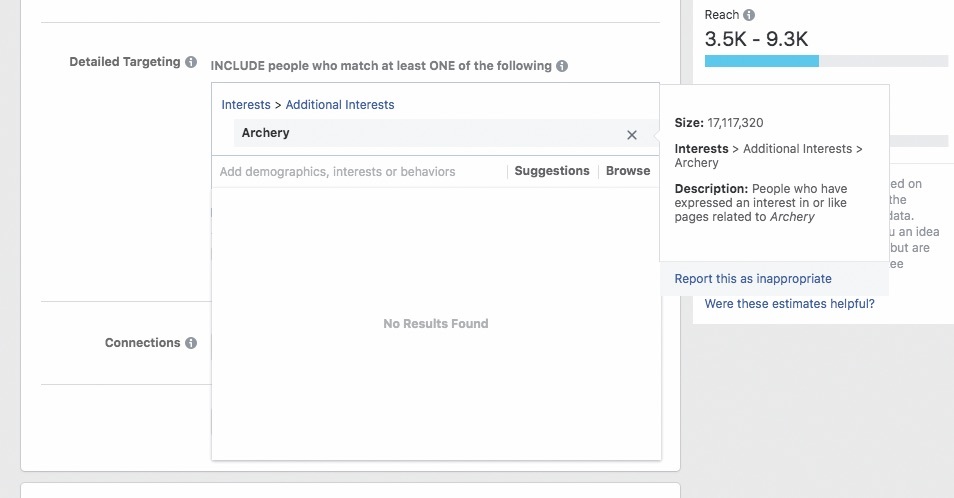
This is also where you can take advantage of Facebook’s algorithm by using the Detailed Targeting section. Type “archery” into this box, for example, and Facebook will only show your ad to people who meet your other criteria (location, age, etc.) who also like archery. You can add other interests into that box to expand your audience — Facebook will show your ad to people who have at least one of those interests.
You’ll notice a drop-down menu labeled Connections. This is where you can specify whether you want to target people who already like your Facebook page. You can also target friends of people who like your page, and you can exclude people who already like your page if you’d rather focus on increasing your reach.
3. Choose Your Ad Placement
Facebook recommends using its automatic placements option, which will serve your ad across all of Facebook’s assets. This can work just fine, but most people will get more out of focusing on Facebook news feeds. Ads placed in the right-hand column may be cheaper, but how often do people look at them?
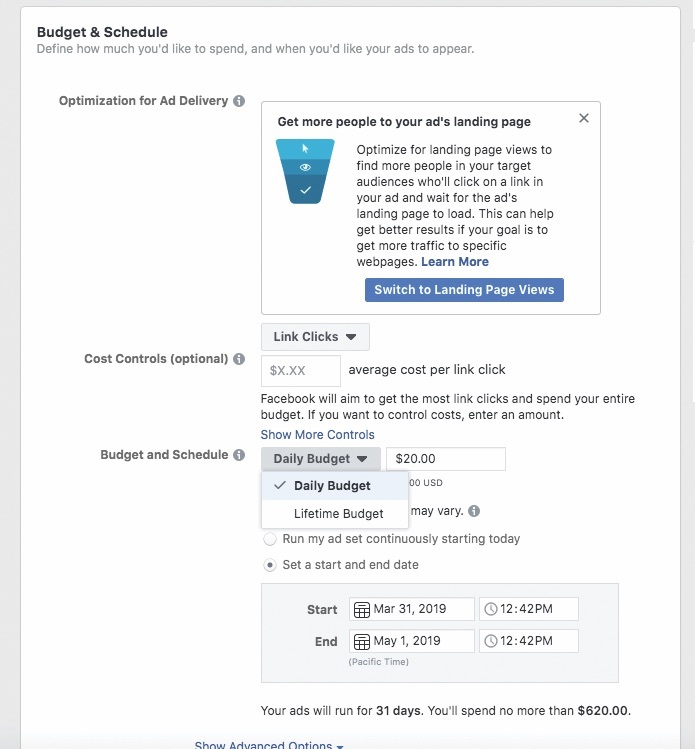
4. Set Your Budget
You don’t need a ton of money to start advertising on Facebook. In fact, while you’re getting started, it’s best to start with a low budget. You can experiment with running ads for less than $5 a day. It’s important to be realistic about your budget. You can set a daily budget, meaning the maximum amount you want to spend per day, and you can set a lifetime budget, meaning the maximum amount you want to spend on a specific ad. Just know that Facebook will spend however much you tell it to spend.
5. Choose Your Ad Type
You’ve established your campaign, you’ve created your ad set and now you’re finally ready to work on your ad. Facebook offers a number of options. You could run a single image or video, which is a good beginning option. If you’re advertising multiple products, say for a sale, you could also go with the carousel options, which lets you run multiple images with corresponding copy that viewers can click through.
6. Create Your Ad
For your ad, you’ll need an image or video, a headline and ad copy. You’ll also need to set your destination, which is where Facebook will send people when they click on your ad. As you’re getting started, the easiest destination to use is simply your website.
When you’re choosing your photo or video, you want to use something that will grab a potential customer’s attention. When people are quickly scrolling through their news feeds, a poor-quality image isn’t going to get them to stop and take another look. Need help with photos? ATA members can now visit the new ATA Resource Website at www.archerytrade.org/resource-website for access to free images, videos, educational materials and other resources to help your business.
Your headline will appear under your image or video and should be brief. The ad copy, which will appear above your image or video, can be longer. In addition, you can select a Call to Action button. Facebook gives you lots of options, but in general you’ll probably just go with “Learn More.”
7. Confirm and Wait
That’s it! You have successfully created an ad. Now all you have to do is hit “Confirm” and wait to see if Facebook approves your ad.
Getting More Out of Likes
People who react to your ad, whether by liking it or commenting on it, are warm leads. Follow up on their interest by inviting them to like your page. When you run an ad, you have the ability to click on the reactions under the ad. Facebook will them show you everyone who has interacted with that ad. The “Invite” button next to their names lets you send a quick invitation for them to like your Facebook page. This can be an incredibly effective way to get more out of your Facebook ads.
Sidebar: The Magic of the Facebook Pixel
Ever shop for something online and then notice ads for that item appearing in your Facebook news feed? That’s the result of the Facebook pixel, an incredibly helpful tool Facebook offers. The pixel is a unique 15-digit ID generated through Facebook that you install on your website. When someone with a Facebook account visits your website, the pixel tracks that visit. If you create a custom audience of people who have interacted with your brand, Facebook will show your ad to people who have visited your website.