You’ve mounted red-dot optics on ARs for years, never received a complaint and the process has become so routine that you rarely consider mentioning the value-added service. Most of your loyal customers prefer doing it themselves, anyway, but the market has changed in dramatic fashion.
The National Shooting Sports Foundation estimates 40 percent of the record-setting 21 million firearms sold last year went home with a first-time gun owner. That comes to another 8.4 million people who joined the ranks of those whose primary, often only, reason for owning a firearm is protecting themselves and loved ones.
It may’ve taken 2020’s collision between widespread social unrest and COVID-19 before they made the purchase, but by now those new owners have witnessed the advantages of accessorizing. Those with discretionary funds reaccumulated are eager to add the lasers, lights, grips and optics that will improve their self-defense capabilities.
Even novice gun owners can install a red-dot or holographic sight on their AR, but the process is lightning fast at the counter and provides an opportunity to establish a long-term relationship with the customer. A little conversation goes a long way in today’s fast paced sales environment, and the way you accomplish the task reinforces your shop’s attention to detail. The service puts you head and shoulders above the competition — something they’ll never get from an online purchase.
You know the steps, more than likely, but there are worthwhile additions when dealing with new enthusiasts. It all starts with the kind of emphasis on safety that effectively communicates the fact that their entire family will be comfortable shopping in your establishment — even those unfamiliar with firearms.
First, keep the firearm pointed in a safe direction and ensure the safety is engaged. If not, do so. Drop the magazine, if one is inserted, then work the charging handle. Check that the chamber is empty before proceeding. If there’s a cartridge inside, work the charging handle until the firearm is clear.
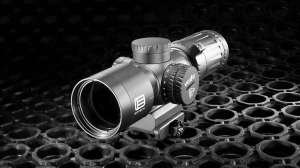
Despite today’s cutting-edge quality control, things get left out of packaging or rattle out during shipping. Open the red-dot optic’s package, inventory parts and, if you’re not familiar with the manufacturer’s specifications, consult the instructions.
Open the battery compartment and install the battery. Those tiny power sources have a long shelf life, but they leak energy while sitting in boxes. Now’s the time to discover any problem instead of later, when it requires wrestling with the optic while mounted on the firearm.
Activate the unit by the pressure, rotary or slide switch — depending on model — and work the controls. Make sure it functions properly throughout. It’s also a great time to hand the unit to the customer so they get a glimpse through the glass prior to mounting. It also reduces their urge to swing the gun unsafely later.
Consult with the customer to determine rough mounting position. Most red-dots don’t take up a lot of real estate on the upper receiver’s Picatinny, so there’s no shortage of locations. Keep in mind the owner’s arm length, preferred setting on an adjustable stock and the firearm’s ultimate mission. Sight-picture acquisition should be fast and intuitive with practice, but controls must be accessible under stress.
Invest time on this step and the dividends are big. When possible, ask the customer to shoulder guns you have in stock that already have a red-dot optic installed — preferably an identical one. The options you’re providing are unfamiliar territory to most new gun owners. That customer care and knowledge will be remembered, and you’re minimizing the number of times you’ll be asked to relocate the purchased optic.
Now take a good look at the section of Picatinny where the red dot will mount. Inspect the bottom of the red dot to ensure it’s also free of debris or packing material. Clean if necessary.
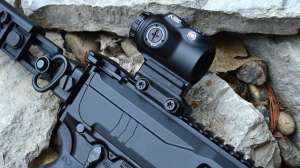
You’re ready to place the red dot. Hand-tighten at first — although throw levers go on convincingly right away — and ask the owner to shoulder the gun, point in that safe direction, and check eye relief. Make sure they can work controls with minimal effort.
When positioning is correct, tighten the red dot to manufacturer’s specifications while applying firm pressure toward the muzzle of the gun. The technique minimizes the chances of movement under recoil by mating the optic solidly with the rail surface directly ahead.
Adjust windage and elevation to co-witness with any backup iron sights or bore sight. You can also head to the firing line. Make sure the customer understands the process and provide them with all packaging and tools provided with the optic.
Don’t forget to mention the warranty, and you’re ready to send another happy customer out the door, hopefully bragging about the unexpected service they received.